Objectives
- Introduction to GSM
- Learn how to connect to the internet via SIM
- Learn how to send a text or a call via GSM
Things
- Arduino UNO
- GSM shield
- SIM800L
Let’s begin!
GSM is an acronym that stands for Global System for Mobile communication. The GSM was designed as a second generation cellular technology. One of its main objectives was to provide a system that would enable greater capacity to be achieved than the previous first generation analog systems. GSM achieved this by using a digital TDMA (time division multiple access approach). By adopting this technique more users could be accommodated within the available bandwidth. In addition to this, ciphering of the digitally encoded speech was adopted to retain privacy.
With the help of a GSM sim and a GSM shield, it is possible to connect to the internet by using an Arduino board.
The Arduino GSM shield allows an Arduino board to connect to the internet, send and receive SMS, and make voice calls using the GSM library.
The shield will work with the Arduino Uno out of the box. The shield will work with the Mega, Mega ADK, Yun, and Leonardo boards with a minor modification. The Arduino GSM shield is a GSM modem. From the mobile operator perspective, the Arduino GSM shield looks just like a mobile phone. From the Arduino perspective, the Arduino GSM shield looks just like a modem.
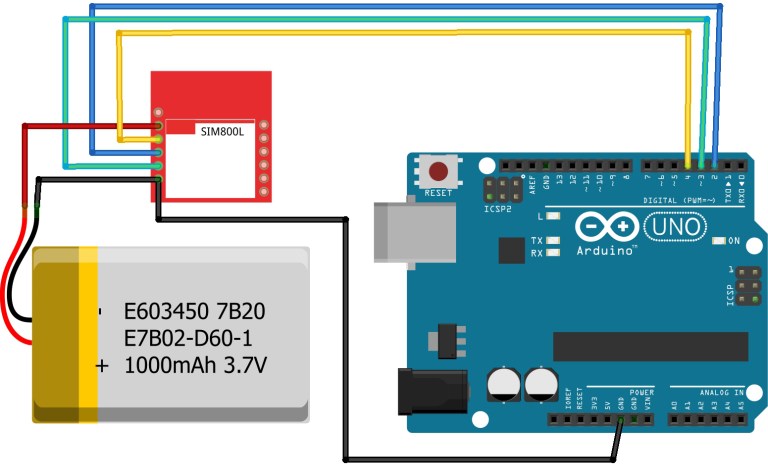
Interfacing the Arduino and SIM800L
Final Code
Before you start uploading the code, download the library which we use in our code here. The library used is Adafruit’s FONA library.
Code for sending an SMS
#include <SoftwareSerial.h>
#include "Adafruit_FONA.h"
#define FONA_RX 2
#define FONA_TX 3
#define FONA_RST 4

char replybuffer[255];
SoftwareSerial fonaSS = SoftwareSerial(FONA_TX, FONA_RX);
Adafruit_FONA fona = Adafruit_FONA(FONA_RST);

uint8_t readline(char *buff, uint8_t maxbuff, uint16_t timeout = 0);

void setup() {
  while (!Serial);
  Serial.begin(115200);
  Serial.println(F("FONA basic test"));
  Serial.println(F("Initializing....(May take 3 seconds)"));
  fonaSS.begin(4800);
  if (! fona.begin(fonaSS)) {
    Serial.println(F("Couldn't find FONA"));
    while (1);
  }
  Serial.println(F("FONA is OK"));
   char sendto[21], message[141];
   flushSerial();
   Serial.print(F("Send to #"));
   readline(sendto, 20);
   Serial.println(sendto);
   Serial.print(F("Type out one-line message (140 char): "));
   readline(message, 140);
   Serial.println(message);
   if (!fona.sendSMS(sendto, message)) {
      Serial.println(F("Failed"));
   } else {
      Serial.println(F("Sent!"));
   }
}


void loop() {}

void flushSerial() {
    while (Serial.available())
    Serial.read();
}

uint8_t readline(char *buff, uint8_t maxbuff, uint16_t timeout) {
  uint16_t buffidx = 0;
  boolean timeoutvalid = true;
  if (timeout == 0) timeoutvalid = false;
  while (true) {
    if (buffidx > maxbuff) {
      break;
    }
    while(Serial.available()) {
      char c =  Serial.read();
      if (c == '\r') continue;
      if (c == 0xA) {
        if (buffidx == 0)   // the first 0x0A is ignored
          continue;

        timeout = 0;         // the second 0x0A is the end of the line
        timeoutvalid = true;
        break;
      }
      buff[buffidx] = c;
      buffidx++;
    }
    if (timeoutvalid && timeout == 0) {
      break;
    }
    delay(1);
  }
  buff[buffidx] = 0;  // null term
  return buffidx;
}
Code for making a call
To make a call, we must attach a speaker to the SPKRP and SPRKRN terminals of the SIM800L and an electret microphone to the MICP and MICN terminals. Then we can replace the portion of the code above with this:
char number[30];
flushSerial();
Serial.print(F("Call #"));
readline(number, 30);
Serial.println();
Serial.print(F("Calling ")); Serial.println(number);
if (!fona.callPhone(number)) {
Serial.println(F("Failed"));
} else {
Serial.println(F("Sent!"));
}


No comments:
Post a Comment